Latest Entries »


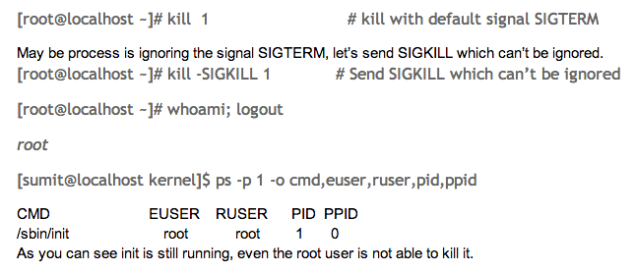
In college days, I heard about the init process. It is the root of process tree and first process started by the kernel and so on. I wanted to see what happens if we kill it. So I tried a lot but no success. Let’s kill the init process and observe what is happening

Note: Fedora switched systemd a while back, if you running Fedora you will find process “systemd” is with pid 1 instead of init.

Image

Now, Years later I was reading Linux Kernel Development I was going through kernel sources mentioned in the book and all of a sudden I found the answer.

Note: File Paths mentioned here are relative to kernel source tree. I am using linux kernel 2.6.34.

In kernel/fork.c, in function copy_process(…) I found this

/*
* Siblings of global init remain as zombies on exit since they are
* not reaped by their parent (swapper). To solve this and to avoid
* multi-rooted process trees, prevent global and container-inits
* from creating siblings.
*/
if ((clone_flags & CLONE_PARENT) && current->signal->flags & SIGNAL_UNKILLABLE)
return ERR_PTR(-EINVAL);

Mark the above code as Listing 1. We know that operating system keep information about a process in process control block (PCB). In Linux, PCB is implemented as structure called task_struct declared in include/linux/sched.h. task_struct store all the important information about a process like it’s pid, memory mapping, signal mask etc…

Now, task_struct contains pointer to structure signal_struct named signal. Inside signal_struct field flags (unsigned int) refers to signal flags for the given process

struct task_struct {
…................
signal_struct *signal
…................
}

Form include/linux/sched.h
struct signal_struct {
…....................
unsigned int flags;      /* see SIGNAL_* flags below*/
…....................
}</pre>
#define SIGNAL_UNKILLABLE       0x00000040 /* for init: ignore fatal signals */

The above code (marked listing 1) prevents init from creating any siblings. In the above code current refers to the pointer  to task_struct for current process. init is the only process for which current->signal->flags is set to SIGNAL_UNKILLABLE. So, if init tries to create siblings using clone syscall, -EINVAL is returned.

Let’s see what happens when we remove the SIGNAL_UNKILLABLE flag from init. To do this I wrote a loadable kernel module. To learn how to write a loadable kernel module refer to

1. The Linux Kernel Module Programming Guide by Peter Salzman.

He also has a great tutorial on gdb you can find it on this link.

2. Book: Linux Device Drivers from O’REILLY.

Excerpt from the code.

/* Description: Remove UNKILLABLE flag from init */
…............
…............
static int hello_init(void)
{
struct task_struct *task;
    struct task_struct *init_ptr = NULL;
for (task = current; task != &init_task; task = task->parent) {
       init_ptr = task;
}
/* init_ptr now points to init, and task now points to init's parent i.e. swapper with pid 0 */
printk(KERN_ALERT "I am %s with pid %i\n", task->comm, task->pid);
printk(KERN_ALERT "I am %s with pid %i\n", init_ptr->comm, init_ptr->pid);
printk(KERN_ALERT "0x%x\n", init_ptr->signal->flags);

/* remove the UNKILLALBE flag */
init_ptr->signal->flags = init_ptr->signal->flags & ~SIGNAL_UNKILLABLE;
printk(KERN_ALERT "0x%x\n", init_ptr->signal->flags);
return 0;
}
…................
…................

When the above code is compiled, module hello.ko is generated. When we issue

“insmod hello.ko” command module initialization function hell_init is called.

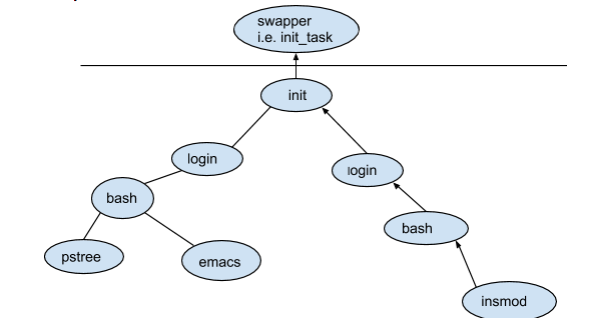
When we insert the module using insmod command, current points to task_struct of insmod process, so in the for loop we keep on we keep on moving up the process tree until we encounter init_task as show in the picture below.

for (task = current; task != &init_task; task = task->parent) {
init_ptr = task;
}

Screen Shot 2013-08-16 at 8.20.04 PM

So, with first iteration we move from insmod to bash and so on until we reach init_task. Despite it’s name init_task is parent of init process and has pid of 0. It’s statically allocated and is not visible in user space.

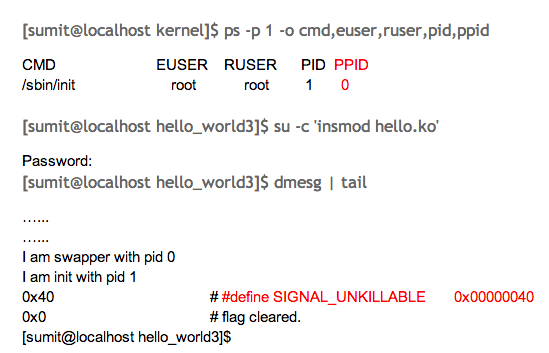
Screen Shot 2013-08-16 at 9.14.20 PM

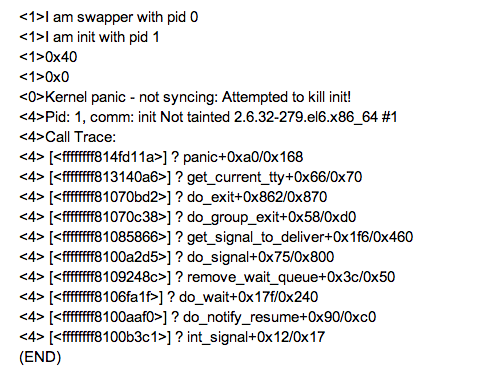
After that I am able to kill init using command “kill -9 1”. The moment I do kernel panics. I get core dump using kdump. Below is the dmesg output.

DMESG Output

NOTE: Since wordpress.com doesn’t allow you to create iFrames and manual code, We faced lot of issues while formatting this post. There are still issues with the alignment. We regret the inconvenience caused to you. Soon we will be moving to a personal domain and work for the same has already been started.

References

1. Manpages: man 7 signal, man ps

2. Linux Kernel Development By Robert Love

3. Linux Kernel Sources 2.6.34

4. Tools you may find useful: ctags, cscope, kdump.

Pages : Follow flossstuff on Twitter      


Few days back I attended a training given by Alexis Abril. It changed my thoughts about the JavaScript. Earlier my thought on JavaScript was “JavaScript is a scripting language just to manipulate HTML DOM elements mainly”.But after going through in-depth knowledge of JavaScript,I became a fan of JavaScript. It is not only document.getElementById , but it is a real programming language. Its prototype nature is really awesome. No doubts there are some flaws in the language but I think every language contains them. Context,prototype,functions are some of the remarkable features of this language.Moreover Javascript also possesses Object oriented nature but in a slight different manner. Libraries like JQuery,Dojo etc has further extended the capabilities of this language. I would recommend every web developer especially UI developers to learn this language in-depth. Few of the books I am following on the recommendation of Alexis Abril are JavaScript: The Definitive Guide 6th Edition and JavaScript: The Good Parts 1st Edition.. I would recommend readers to get the sixth edition of Definitive Guide because it includes HTML5 also. Second book is written by great Douglas Crockford and includes some advance JavaScript philosophies..

Pages : Follow flossstuff on Twitter      

2012 in review


The WordPress.com stats helper monkeys prepared a 2012 annual report for this blog.

Here’s an excerpt:

4,329 films were submitted to the 2012 Cannes Film Festival. This blog had 49,000 views in 2012. If each view were a film, this blog would power 11 Film Festivals

Click here to see the complete report..

Pages : Follow flossstuff on Twitter      


We all need to look for word definition. Online dictionaries and wikipedia are great but we are not always connected to the net. sdcv is a console version of StarDict dictionary. Using sdcv you can search for definitions while still offline. So here are the step to install and make use of this great program.

Step 1. Installation

On Ubuntu

Open Up terminal and type:

$ sudo apt-get install sdcv

On Fedora

$ su -c “yum install sdcv”

On Mac OS X

Mac OS comes with a great GUI based dictionary, but cli enthusiasts will enjoy sdcv.

Please install Macports and then open Finder, Go to Application Folder > Utilities Folder and launch terminal and type

$sudo port install sdcv

Step 2. Download Dictionary Files

Now that we have installed sdcv, we need to download dictionary files from the net.

Go to this site1 , site 2  and download dictionary files according to you requirements. For open source fans, Free On-Line Dictionary of Computing (FOLDOC) and Jargon file are must. They are both available from site1.

FOLDOC: Dictionary for computing subjects.

Jargon File: “A comprehensive compendium of hacker slang illuminating many aspects of hackish tradition, folklore, and humor.” – From Jargon File Homepage.

GNU/Linux English-English Dictionary: You can download it form here.

Step 3. Install downloaded Dictionary Files

Now that you have downloaded the dictionary files we need to put them in the folder where sdcv looks for dictionary files when invoked.

On Linux based systems do the following

$sudo mkdir /usr/share/stardict/dic/

$sudo tar -xvjf downloaded.tar.bz2 -C /usr/share/stardict/dic or

$sudo tar -xvzf downlaoded.tar.gz -C /usr/share/stardict/dic

Note: Make sure the user who will be invoking the sdcv command has read and execute permissions on /usr/share/stardict/dic/ and its subfolders.

On Mac OS X

$mkdir -p $HOME/.stardict/dic

$sudo tar -xvjf downloaded.tar.bz2 -C $HOME/.stardict/dic

Note: Unfortunately you need to repeat this process for every user that needs access to these dictionary files.

Step 4. Enjoy sdcv

Searching for definition

$ sdcv Linux                         (looks for linux in the dictionary.)

$ sdcv                                  (invoes sdcv in the interactive mode, press Control-D to quit).

In earlier article we covered how to use espeak, now you can combine sdcv and espeak together. Sdcv to look for definition and espeak for pronunciation.

$ sdcv Linux && espeak Linux

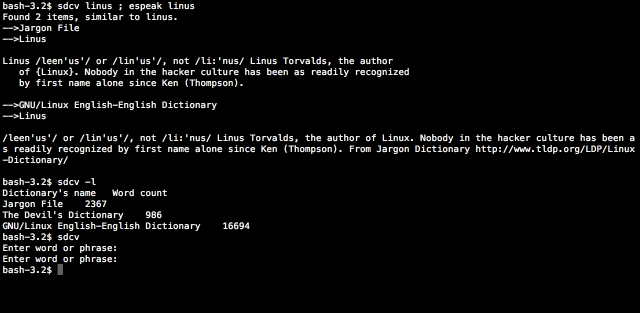
Here is a picture.

"sdcv"

Note: Sometimes due to the long definition of a particular word text scrolls down too fast for you to read, advanced users can set SDCV_PAGER environment variable to /usr/bin/less. Now, less will be used to display to the dictionary’s article. You may consider adding this to your .bashrc file. Check out manpage for sdcv for more information.

Pages : Follow flossstuff on Twitter      


Sometimes we want out Linux box to speak to/for us.This ability is very useful to make announcements and alerts in case of many critical events in our machines or can be used just for sheer fun. There exists a command line synthesized known as espeak that comes pre installed in Ubuntu. You can also install it on debian systems by typing the command sudo apt-get install espeak  in a command console .For all other operating systems you can install it from source available at http://espeak.sourceforge.net/download.html The usage of espeak is pretty straight forward, just  type  espeak   “text to announce”  in a text console and listen your computer speaking the text.Some basic options to control espeak  are :

a <integer>     sets the amplitude/loudness of the speech
f <filename>  speaks the content of the given file
p <integer>     sets the pitch/frequency of the speech

s <integer>     sets the speed of the speech in words/minute 

Espeak is a cross platform utility that runs on more than half a dozen of OS platforms. So go through its man page by typing man espeak in a text console , explore it more and make your machine speak.

Pages : Follow ankurtwi on Twitter      


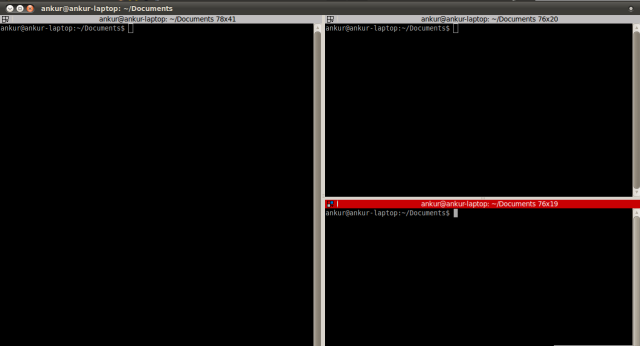
Command line terminals are an indispensable part of *IXs. We all need those sooner or later. Usually we want to open many terminals at a time to do various things in those but placing them in the same screen is bit chaotic. We have an utility on GNOME  desktop environment  known  as terminator that is able to create multiple terminals in same window. These  multiple terminals could be created by horizontally, verticallly or tab dividing the window. Screenshot of the same is shown below :

Multiple Terminals

To install it on Ubuntu, issue command  sudo apt­-get install terminator. To launch it  on ubuntu go to Applications -> Accessories -> Terminator . You can also type terminator in cli shell to launch it. If you want to install it manually then you can download it from their official page .

The basic key combinations are:

Ctrl+Shift+O for   the  horizontal division
Ctrl+Shift+E for the vertical division,
Ctrl+Shift+T for the  tab  division
Ctrl+Tab  to switch between the created terminals
Ctrl+Shift+q to quit terminator.

The terminator supports a hell lot of functionalities like grouping ,automatic logging,multiple searching etc. For more info about the terminator, access its man page through man terminator command.

Pages : Follow ankurtwi on Twitter      


Pygame API is an  extension of SDL in python. You can create games quickly and easily  using this. I recently created a repository on github named as ‘Pygame-Examples-For-Learning’ to motivate the learning of this API. This repository consists of various small demos (from hello world to the sprite demo). You can try out those using your own logic and can apply the same into large programs. It also includes a small 3 level game ‘Hungry-Snake’ . Just a contribution from my side to all the enthusiast learners out there (open source too) 🙂 Play with the code to explore more. I will keep updating the repo in future also. You can also contribute in the same. Link to the repo : http://github.com/ankur0890/Pygame-Examples-For-Learning 🙂 Feedback and suggestions are always welcomed 🙂

Pages : Follow ankurtwi on Twitter      


This trick (by Sumit Rai) was published in Linux For You (LFY) under the Tips And Tricks Section. Sharing it with all the Linux Geeks out there 🙂

When you format a partition in Linux , 5% of the total space gets reserved for privileged  processes, by default. This is done so that system processes continue to function correctly ,if the filesystem gets full. This is useful for your ‘root’ partition.However if you have let us say 50GB separate home partition, you may want to make use of few additional GBs by reducing the percentage of the reserved space. You can use tune2fs command to change  the default allocation of space  reserved for privileged  processes. Command for the same is :
#tune2fs -m 1  /dev/sda6
Here  we have changed space reserved for privileged  processes on /dev/sda6 to 1 percent. You can use your device file according to the target partition instead of  ‘/dev/sda6’ . You can see the effected change by mounting the filesytem and checking available space using df command before and after you execute the above command. This command is quite useful in so called ‘Emergency’, so do remember it 🙂

Pages : Follow ankurtwi on Twitter      


I started writing for Linux For You Magazine in August 2010. Since Then I have written over 10 articles for this International Magazine. Today I am providing the readers with all the links to my articles. All the work done is under Creative Common License as described in the sidebar widget also.

1. Let’s Play With Emacs CLI : This teaches you the basics of the ‘Emacs’ Text Editor. This articles was published in the Aug 2010. I published it in two parts on my blog. Click on respective part numbers to read  : Part 1  Part 2  .

2.  Cut and Play With Pitivi Video Editor : A tutorial on how to use Pitivi video editor to play with videos in an experimental way. It was published in the Nov 2010 Edition.  Click to Read

3.  Let’s Play With Gnu Screen :  Tutorial about one of the greatest utility provided by GNU also know as ‘virtual terminal manager’ . It was published in Feb 2011 Edition . Click To Read

4. Get Started With Pygame Part 1 : One of my favorite series 🙂 It teaches you the basics about the pygame API of the python module. Pygame is the python extension of the SDL with some additional benifits. This article was published in May 2011. Click To Read

5. Get Started With Pygame Part 2 : Advance knowledge about the pygame API. Includes the color play and sprites usage tutorial . It was published in July 2011. Click To Read

6. Connection To Mysql With Python  and Php : Simple tutorial on how you can successfully connect mysql to your program of python or php. It was published in Aug 2011 . Click To Read

7. Recovered Deleted Files In Linux :  Different ways of recovering your deleted files using utilities like scalpel , foremost etc. It got published in Sep 2011 . Click To Read

8. Let’s Play With CodeIgniter Part 1 : Teaches you the basics of the PHP based framework ‘CodeIgniter’ . This frameworks is really useful and changes the way I used to code in PHP. It follows the MVC approach. It was published in the Oct Edition. Click To Read

There are certain articles like ‘Let’s Play With VirtualBox’,’Using Nessus and Metasploit’,’Play With GUI’s In Python’ that hasn’t been published  online yet . I will publish them in future on this blog and will provide you the links. So click on the links and explore the stuff 🙂

Pages : Follow ankurtwi on Twitter      


Buy

Wikipedia : One of the most important web portal in  geek’s life. Whenever I need to search anything I use two things. First open up the Google and then search for the related  wikipedia page. Exploring wikipedia page using shell is possible. Interested fact is that we can do it without even opening the cli browser. We can make wikipedia text query over dns for an ip address. I learned this trick from Ajay Sharma (ajayctk@gmail.com). Thanks to him for teaching me this wonderful trick. Let’s explore how to do it 🙂

We will use ‘dig‘ utility for this purpose. Dig is more popularly known as the DNS lookup Utility. You can find more about it using  man pages. Syntax for the text based wikipedia query is : dig +short txt <keyword>.wp.dg.cx . For example if you want to look into the wikipedia page of Linux you need to type something like this : dig +short txt  linux.wp.dg.cx . Screenshot of the same is attached below :

Making A Wikipedia Query In CLI

For multiple word search having spaces in between them you can use the traditional ‘\’ operator. To grasp the wikipedia page  of  Free Software Foundation (FSF) we need to type dig +short txt  free\ software\  foundation.wp.dg.cx . 

FSF Wikipedia Search

Only problem is its quite limited. I am trying to figure out a way through which we can look up the whole page but I think this much is also quite useful as most of the times we came to know about the product by reading one or two lines only. So play with wikipedia using Shell only 🙂

Pages : Follow ankurtwi on Twitter